Part A - Create Workspace
- Create a workspace. i.e: From within Eclipse IDE File menu --> Switch Workspace >> open... "correc-sandbox/correc-sandbox-workspace"
Part B - Workspace Setup
- Import the two plugins and one feature from the "sandbox-repository" using Import >> General >> Existing Projects into Workspace. If you are interested in creating a launch configuration, you must at least import the package "com.corgroup.correc.sandbox."
- Set up the target.
Open the "com.corgroup.sandbox.target" found at the root level of the "com.corgroup.correc.sandbox" plugin.- Select location $(correc.sandbox.target}/plugins
- Select Edit
- Select Variables
- Select Edit Variables
- Select New
- ⁃ Name: correc.sandbox.target
- ⁃ Value: Browse to location sandbox-target directory
- ⁃ Select Okay
- Select Apply and Close
- Select Cancel
- Select Finish (Make sure you haven't inadvertently added the variable to the location twice)
- Select the Environment tab and establish that the values match your system.
- https://download.eclipse.org/eclipse/updates/4.33 is included as a target entry but may be substituted.
- Select Update
- Save com.corgroup.sandbox.target
- Set as Active Target Platform
- Select Project Menu >> Clean and check Clean all projects.
You may notice two warnings in the Problems view regarding "adminStubbed" and "logStubbed." These warnings will be referenced later.
- Create a launch configuration. You can find an overview of the launch configuration used by CORGROUP in the "com.corgroup.correc.sandbox" file, specifically under the name _Launch Configuration. Getting the launch
configuration correct can sometimes be challenging. When problems occur, they are typically due to a missing required plugin or an incompatible JRE.
- Select Run menu >> Run Configuration
- Right-click Select Eclipse Application >> New Configuration
- The Main tab should be selected.
- ⁃ Enter name: com.corgroup.correc.sandbox.product
- ⁃ Run as Product: com.corgroup.correc.sandbox.product
- ⁃ Java executable java
- ⁃ Execution environment JavaSE-17 or greater
- Select the Plug-ins tab.
- ⁃ Set Launch with: Plugins selected below
- ⁃ Select the button Deselect All
- ⁃ Select the two Workspace plug-ins: com.corgroup.correc.sandbox and correc.plugin
- ⁃ Select the following plug-ins from the Target Platform.
- ⁃ com.corgroup.bmp
- ⁃ com.corgroup.bmp.client
- ⁃ com.corgroup.bmp.osgi.service
- ⁃ org.eclipse.http.registry
- ⁃ org.eclipse.equinox.http.jetty
- ⁃ Deselect Include optional dependencies when computing required Plug-ins
- ⁃ Select button Select Required
- ⁃ Make sure that "org.eclipse.equinox.http.registry" was selected under Target Platform
- ⁃ Select Apply
- ⁃ Select Run
Part C - Create COR•REC Module Plugin
- Start by creating a new Plugin Project:
- ⁃ Select File Menu --> New --> Plugin Project
- ⁃ Fill out as follows
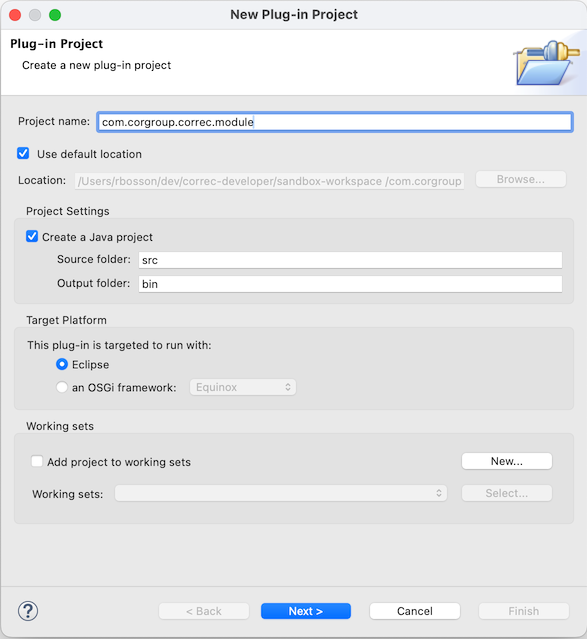
- Select Next
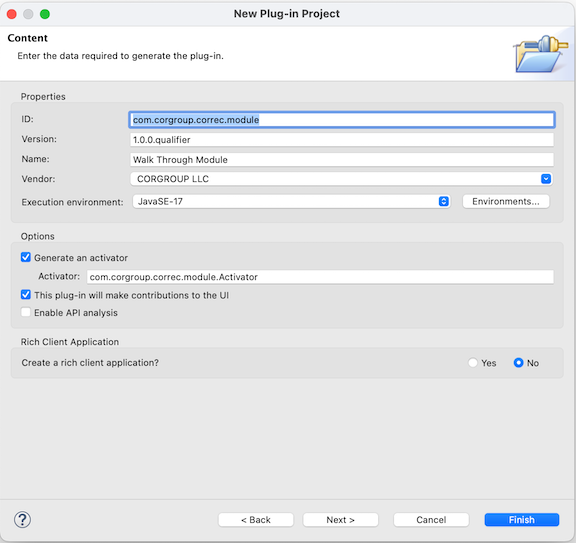
- Select Finish
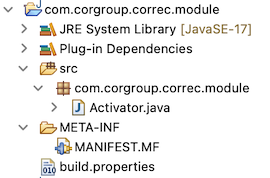
From within your Project explorer, locate the plugin "com.corgroup.correc.module" when expanded it should look like this.
Part D - Flush Out The Plugin
Copy
Copy the following folders and files from the downloaded [Classes-Folder/_com.corgroup.correc.module-root] directory to the root level of com.corgroup.correc.module plugin.
- Folders
- ⁃ css
- ⁃ html
- ⁃ images
- Files
- ⁃ toc.html
- ⁃ toc.xml
- ⁃ tocaspect.xml
- ⁃ tocgettingstarted.xml
- ⁃ tocworkspace.xml
- Properties Files
To start, create two property files. While these files are not strictly necessary, they are utilized by the COR•REC platform to support localization.
The first file, named "m_moduleAC_en_US.properties," is registered during the launch phase of the COR•REC application. It should be kept concise, as its primary use provides a name for the button on the Action Card.
The second file, "m_module_en_US.properties," is used by the plugin, and will be demonstrated. The "_en_US.properties" designation is only an example; there is no reason why localization cannot be applied. Please note that the properties files included in the supplied target plugins have not yet been localized.
- Right-click select the "src" folder
- ⁃ Select New
- ⁃ Select File
- ⁃ Name the properties file: m_module_en_US.properties
- ⁃ Create a second properties file: m_moduleAC_en_US.properties
Add the following properties value pairs
- m_module_en_US.properties
- ⁃ correc_module = COR\u2022REC Module
- ⁃ correc_module_pref = COR\u2022REC Module preference
- ⁃ correc_service = COR\u2022REC Service
- ⁃ module_blurb = Description of setup of module or ...
- ⁃ module_intro = COR\u2022REC Module Intro
- ⁃ service = Service
- ⁃ services_available = Services Available
- ⁃ tt_allow_services = Allow service to selected consumers
- ⁃ tt_correc_module_pref = This preference is inert
- m_moduleAC_en_US.properties
- ⁃ correc_module = COR\u2022REC Module
- ⁃ tt_call_pem = com.corgroup.correc.module.extensions.M_ExtensionsModule
- Right-click select the "src" folder
- The MANIFEST.MF
The MANIFEST.MF directs and controls much of what happens during the launch phase and beyond. Open the MANIFEST.MF from the META-INF folder and select the Overview tab at the bottom of the view.
- Overview tab.
- ⁃ Select the checkbox. This plug-in is a singleton found in the left side panel.
- Dependencies
The IDE needs to know what target plugins are required by your plugin. Select the Dependencies tab. The following required plug-ins should be listed [org.eclipse.ui, org.eclipse.core.runtime] we will add three more. Select Add and enter "org.eclipse.help". Many plugins will be listed, select only "org.eclipse.help" and then select Add. Repeat the Select Add process once each for "com.corgroup.bmp" and "com.corgroup.bmp.osgi.service". Your list should look like this:
- ⁃ org.eclipse.ui
- - org.eclipse.core.runtime
- - org.eclipse.help
- - com.corgroup.bmp
- - com.corgroup.bmp.osgi.service
We will return to MANIFEST.MF shortly, so remember to save your changes.
- Overview tab.
- Add classes required by Extensions.
Classes added are required by the extensions we will be adding. The Classes-Folder walkthrough packages that you should have downloaded contain the flushed-out classes and folders to add to the root level of the plugin com.corgroup.correc.module. Keep in mind that the plugin and initial package have the same name. We walked through creating the packages and the classes required. When creating the classes you may instead use the classes supplied (recommended). If you choose to use the flushed-out classes, you will still need to create the packages as described. Don't worry about the reported errors until all packages and classes are added. Additionally, we assume that the following items have already been copied from the Classes-Folder directory to the root level of the plugin.
- Folders
- ⁃ css
- ⁃ html
- ⁃ images
- Files
- ⁃ toc.html
- ⁃ toc.xml
- ⁃ tocaspect.xml
- ⁃ tocgettingstarted.xml
- ⁃ tocworkspace.xml
Create and add class to existing package.
Right-click on the existing package "com.corgroup.correc.module".
Select New >> Class and enter the following:- ⁃ Name: Startup
- ⁃ Interfaces: org.eclipse.ui.IStartup
Create "extensions" package.
Right-click on the existing package "com.corgroup.correc.module".
Select New > Package and enter the name "com.corgroup.correc.module.extensions".
Then, add a class to your package by right-clicking on "com.corgroup.correc.module.extensions" and selecting New > Class.- ⁃ Name: M_ExtensionModule
- ⁃ Super Class: com.corgroup.bmp.extensions.ExtensionModule
- ⁃ Select Finish
Create "intro" package.
Right-click select the existing package com.corgroup.correc.module.
Select New >> Package and enter the package name com.corgroup.correc.module.intro.
Add a class to your package. Right-click select the package com.corgroup.correc.module.intro. Select New >> Class.- ⁃ Name: IntroAction
- ⁃ Super Class: com.corgroup.bmp.intro.IntroExtensionAction
- ⁃ Interfaces: org.eclipse.core.runtime.IExecutableExtension
- ⁃ Select Finish
Create "gui" package.
Right-click select the existing package com.corgroup.correc.module. Select New >> Package. Enter the package name com.corgroup.correc.module.gui. We will add three classes to this package, one ViewPart, two Composite.
Add a class to your package. This time Eclipse will do some work for us. First, select the package you just created. Then, at the top of the workspace find the Actions menu. Open "Create new visual classes" and then select RCP >> ViewPart.
The ViewPart class must be created according to the instructions provided here, rather than simply copying the supplied classes. This is important because the Eclipse IDE generates an extension as outlined, which adds the view as an extension element. Create this class as described, and then replace it with the supplied version.
- ⁃ Name: M_moduleView
- ⁃ View Name: View
- ⁃ Select Finish
Create two additional classes, both of the type Composite. Select the package. At the top of the workspace, locate the Actions menu, open "Create new visual classes," and select SWT >> Composite.
- ⁃ Name: IntroComposite
Repeat the process by selecting "Create new visual classes" again and select SWT >> Composite.
- ⁃ Name: WelcomeComposite
The ViewPart class is placed in com.corgroup.correc.module.gui and the extension org.eclipse.ui.views. One view_element is added to MANIFEST.MF#Extensions. We will look at Extensions next.
Create "handlers" package.
Right-click select the existing package com.corgroup.correc.module. Select New >> Package and enter the package name com.corgroup.correc.module.handlers.
Now, let's add a class to your new package. Right-click on the package com.corgroup.correc.module.handlers, then select New >> Class.
- ⁃ Name: OpenView
- ⁃ Super Class: org.eclipse.core.commands.AbstractHandler
- ⁃ Select Finish
Add another class to your package. Right-click select the package com.corgroup.correc.module.handlers. Select New >> Class.
- ⁃ Name: OpenWorkspace
- ⁃ Super Class: org.eclipse.core.commands.AbstractHandler
- ⁃ Select Finish
Create "preferences" package.
Right-click select the existing package com.corgroup.correc.module. Select New >> Package and enter the package name com.corgroup.correc.module.preferences.
Next, add the following classes to the preference package. Right-click select the package com.corgroup.correc.module.preferences and select New >> Class for each of the following classes.
- ⁃ Name: PreferencePage
- ⁃ Super Class: com.corgroup.bmp.prefs.FieldLayoutPreferencePage
- ⁃ Interfaces: org.eclipse.ui.IWorkbenchPreferencePage
- ⁃ Select Finish
- ⁃ Name: PreferenceInitializer
- ⁃ Super Class: org.eclipse.core.runtime.preferences.AbstractPreferenceInitializer
- ⁃ Select Finish
- ⁃ Name: PreferenceConstants
- ⁃ Select Finish
Create "service" package.
Right-click select the existing package com.corgroup.correc.module and select New >> Package. Enter the package name com.corgroup.correc.module.service. Add the following classes to the service package.
Right-click select the package com.corgroup.correc.module.service and select New >> Class for each class.
- ⁃ Name: AccountReceivableService
- ⁃ Select Finish
- ⁃ Name: CorrecModuleService
- ⁃ Super Class: com.corgroup.bmp.osgi.service.CorrecService
- ⁃ Select Finish
There is an error in CorrecModuleService. Correct this error with the following steps.
- ⁃ Open the CorrecModuleService class.
- ⁃ Select the red underlined class name: CorrecModuleService
- ⁃ Enter Command or Control 1, select Add Constructor....
com.corgroup.bmp.osgi.service.CorrecService
That's all for now. Each class needs to be flushed out. Use the code found in the downloaded Class and Folders directory. Do this before launching com.corgroup.correc.module.
- Folders
- Extensions
Extensions are how COR•REC recognizes the work you have done. Once the execution phase of an extension is invoked it's totally up to you what happens next. Not all extensions have an invoke process as you will see by the first extension we add.
To add extensions open the MANIFEST.MF and select the Extensions tab. For each extension, the following process is used.
- ⁃ Select the Add Button
- ⁃ Enter the [name of the required extension] in the extension filter field.
- ⁃ Select the extension from the list
- ⁃ Select finish.
Extensions require their own unique set of values. If you have followed the walk-through you already have one extension "org.eclipse.ui.views" with one view that was added for us when creating a ViewPart.
com.corgroup.bmp.module:
This extension is required so that your plugin is recognized by COR•REC as an add-on. Fetch the extension as described above. From the Extensions list select the extension. Within the right panel, you will see an ID and Name element. These values may be left blank. Select the "actionID" element below "com.corgroup.bmp.module" when the extension tree is expanded. Enter the following values, an asterisk indicates that the property is required.
- ⁃ id*: com.corgroup.correc.module.module-id
- ⁃ class*: com.corgroup.correc.module.extensions.M_ExtensionsModule
- ⁃ actionID*: com.corgroup.correc.module.action-id
- ⁃ label*: correc_module [this points to a value pair in the m_moduleAC_en_US.properties file]
- ⁃ icon: images/icon.png [located in the image folder copied in earlier]
- ⁃ toolTip: tt_call_pem [this points to a value pair in the m_moduleAC_en_US.properties file]
- ⁃ visible: true
com.corgroup.bmp.properties:
This extension handles making the required properties file available at startup. Add the extension. The Name and ID properties may be left empty. Select the (properties_file) element and set its properties as shown.
- ⁃ FILE_NAME*: m_moduleAC
- ⁃ FQCN•: com.corgroup.correc.module.Activator
com.corgroup.bmp.update_site:
As well thought-out as your plugin may be there may be a time when change is required. The COR•REC platform uses the Eclipse p2 repository update mechanism. This extension holds the location of your update site. Add this extension. Name and ID properties may be left empty. Select the (site_element) element and set its properties as shown.
- ⁃ HRN*: COR•REC Module update site
- ⁃ DESIGNATOR*: UPDATE
- ⁃ URI_SINGLE: https://www.example.com/correc-plugin/single-user/update
- ⁃ URI_MULTI: https://www.example.com/correc-plugin/multi-user/update
com.corgroup.bmp.intro:
The Welcome view is available in the Help menu when the COR•REC Platform workspace is selected. This is normally used to facilitate setup or updates required by your plugin. Add this extension. Name and ID properties may not be left empty. From the Extensions list select the extension and enter the following properties.
- ⁃ ID: correc.module.intro
- ⁃ Name: correc.module
Select the (intro_element) element and set its properties as shown, the start element value = zero.
- ⁃ class*: com.corgroup.correc.module.intro.IntroAction
- ⁃ start*: 0
- ⁃ id: com.corgroup.correc.module.intro
com.corgroup.bmp.osgi.service:
Service is the mechanism used within COR•REC where developers share their API. It is entirely up to the plugin developer as to what that means and entirely up to the user to decide whether to allow the collaboration between plugins. This extension is best considered a request to access an installed plugin's service. This example requests permission to access a COR•REC Accounting service that provides access to accounts receivable. Plugins that offer services publish their ids. Name and ID properties may be left empty. Select the (service_id_element) element and set its properties as shown.
- ⁃ service_id: com.corgroup.bms.accounting.ar#ACCOUNTS
- ⁃ hr_name: COR•REC Module
org.eclipse.ui.commands:
Commands are incorporated into other extensions. We will need a command to open our view and the action required when selecting our workspace from the workspace menu. Add this extension. Name and ID properties may be left empty. This extension allows for variable element types that we will need to select. Right-click select the extension and select New Command then set its properties as shown.
- ⁃ id*: com.corgroup.correc.module.open.view
- ⁃ name*: Open View
Again right-click select the extension select New Command and set its properties as shown.
- ⁃ id*: com.corgroup.correc.module.open.workspace
- ⁃ name*: Open Workspace
org.eclipse.ui.handlers:
In our case org.eclipse.ui.commands and org.eclipse.ui.handlers work together. Add this extension and set its properties as shown.
- ⁃ commandid*: com.corgroup.correc.module.open.view
- ⁃ class*: com.corgroup.correc.module.handlers.OpenView
Right-click select the extension and select handler. Set its properties as shown.
- ⁃ commandid*: com.corgroup.correc.module.open.workspace
- ⁃ class*: com.corgroup.correc.module.handlers.OpenWorkspace
org.eclipse.ui.menus:
Menus in our case represent the main application menu bar. We will add menus. This extension allows variable element types that we will need to select. Add this extension.
Right-click select the extension and select menuContribution and set the property as shown.
- ⁃ location URI: menu:org.eclipse.ui.main.menu
- Right-click select the menuContribution just created and select menu. Set its properties as shown.
- ⁃ label: Workspace
- ⁃ id: bmp.platform.menuWorkspace
- Right-click select the menu just created (a) and select menu. Set its properties as shown.
- ⁃ label: COR•REC Module Workspace
- ⁃ id: corgroup.menuWorkspace.correc.module
- Right-click select the menu just created (b) and select command. Set its properties as shown.
- ⁃ id*: com.corgroup.correc.module.open.workspace
- ⁃ label: COR•REC Module Workspace
- Repeat the menu process as follows:
- Right-click select the menuContribution created above. Set its properties as shown.
- ⁃ label: Aspects
- ⁃ id: bmp.platform.menuAspects
- Right-click select the menu created in step (d) and select menu. Set its properties as shown.
- ⁃ label: COR•REC Module
- ⁃ id: corgroup.menuAspect.correc.module
- Right-click select the menu just created (e) and select command. Set its properties as shown.
- ⁃ commandid: com.corgroup.correc.module.open.view
- ⁃ label: COR•REC Module View
Menu items may also be added to the COR•REC Logs and Administrator menus. This is left as an exercise and may be added using the same processes or simply ignored.
Administrator menu additions
Right-click select the extension and select menuContribution and set the property as shown.
- ⁃ location URI: menu:help?after=additions
Right-click select the menuContribution just created and select menu. Set its properties as shown.
- ⁃ label: Administrator
- ⁃ id: contributedMenuAdmin
Right-click select the menu just created and select command. We have not made a command-handler for this; we leave that as an exercise.
- ⁃ commandid: [your-command]
- ⁃ label: [name-of-your-menu-item]
Log menu additions
Right-click select the extension and select menuContribution and set the property as shown.
- ⁃ location URI: menu:help?after=additions [this is not a copy/paste error]
Right-click select the menuContribution just created and select menu. Set its properties as shown.
- ⁃ label: Logs
- ⁃ id: contributedMenuLog
Right-click select the menu just created and select command. We have not made a command-handler for this; we leave that as an exercise.
- ⁃ commandid: [your-command]
- ⁃ label: [name-of-your-menu-item]
org.eclipse.ui.preferencePages:
Preferences pages developed in this manner are added to the view opened from the menu item "Setting" and "Preferences". Add this extension. Name and ID properties may be left empty. Select the (page) element and set its properties as shown.
- ⁃ id*: com.corgroup.correc.module.preference.page
- ⁃ name*: COR•REC Module Preferences
- ⁃ class*: com.corgroup.correc.module.preferences.PreferencePage
org.eclipse.ui.views:
Handled for us when we created the ViewPart.
- ⁃ id*: com.corgroup.correc.module.gui.M_moduleView
- ⁃ name*: Module View
- ⁃ class*: com.corgroup.correc.module.gui.M_moduleView
org.eclipse.ui.startup:
Early startup is required when a COR•REC module is supplying one or more services. Add this extension. Name and ID properties may be left empty. Select the (startup) element and set the property as shown.
- ⁃ class*: com.corgroup.correc.module.Startup
org.eclipse.help.toc:
Used when adding a help topic to COR•REC Help Content. The required folders and files should have been copied to the root level of this plugin by this point. If not you will need to do that now. Add this extension. This extension allows variable element types that we will need to select.
Right-click select the extension and select toc then set its properties as shown.
- ⁃ file*: toc.xml
- ⁃ primary: true
Right-click select the extension and select toc then set its properties as shown.
- ⁃ file*: tocaspect.xml
- ⁃ primary:
Right-click select the extension and select toc then set its properties as shown.
- ⁃ file*: tocgettingstarted.xml
- ⁃ primary:
Right-click select the extension and select toc then set its properties as shown.
- ⁃ file*: tocworkspace.xml
- ⁃ primary:
org.eclipse.core.runtime.preferences:
Adds your preference initializer before the preference page is opened. Add this extension. Name and ID properties may be left empty. Select the (initializer) element and set its properties as shown.
- ⁃ class*: com.corgroup.correc.module.preferences.PreferenceInitializer
At this point, you should look through the file plugin.xml by selecting the plugin.xml tab. Look for warnings and errors. Normally warnings are generated due to syntax errors.
Investigating the results of our efforts
Open the Run/Debug Configuration and check that com.corgroup.correc.module has been selected. Launch the Eclipse Application "com.corgroup.correc.sandbox.product".
Hopefully, you're golden otherwise you'll need to hunt down what you missed or any syntax errors that may have occurred. Let's take a look at what we've accomplished. The menu bar should contain at minimum an Edit, Workspace, and Help menu. You should be looking at the following Action Card, Mac version shown:
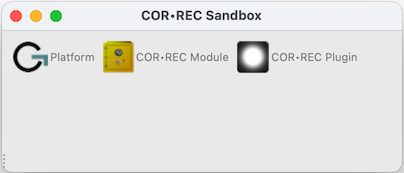
This Action Card contains three icons. In this sandbox selecting an icon will result in a predetermined action. In COR•REC Accounting the Action Card icon allows the user to assign an action. In this walk-through, we created the golden icon COR•REC Module. Select that icon now. A message opens detailing the class called from your action. More specifically the culmination of following extensions and classes produced the result displayed.
- ⁃ com.corgroup.bmp.module: Placed the icon on the Action Card and when selected called com.corgroup.correc.module.extensions.M_ExtensionsModule.run().
- ⁃ com.corgroup.bmp.properties: Supplied the title "COR•REC Module"
Selecting the Workspace menu displays the menu "COR•REC Module Workspace" which contains the sub-menu item "COR•REC Module Workspace". Selecting the sub-menu item opens a message dialog detailing the class called. More specifically as follows:
- ⁃ org.eclipse.ui.menus: Placed the Workspace menu on the menu bar along with our selections.
- ⁃ org.eclipse.ui.commands: Connected the org.eclipse.ui.handlers to the class com.corgroup.correc.module.handlers.OpenWorkspace.
Selecting the Platform Icon on the Action Card results in a blank COR•REC Workspace opening. An additional menu titled "Aspects" has been placed on the menu bar. Select the Aspects menu "COR•REC Module" offers a sub-menu item "COR•REC Module View". Selecting the sub-menu item places our view in the workspace. Getting here follows the same pattern as when you selected "COR•REC Module Workspace". The view contains a message indicating that the Account Receivable Service is unavailable. The code that tests for the availability of the service is located in M_moduleView.class.
Close the view and the workspace. Both are closed by closing the COR•REC Platform workspace. Select the Help menu. The first menu item listed is Help Contents. Release the help menu. Open the COR•REC Platform workspace and again open the Help menu. The first menu listed is now Welcome. If you are familiar with Eclipse IDE Welcome/Intro this is similar and only made available when the COR•REC Platform workspace is selected.
Select the Help menu item Welcome. The M_moduleView containing the WelcomeComposite is placed in the COR•REC Module Workspace. Selecting the tab COR•REC Module Intro or the COR•REC Module button icon will display the IntroComposite.
Select the Help menu item Help Contents. A browser opens to display the help topic COR•REC Module. COR•REC Accounting, Inventory ... use this format for each help topic they include.
By now you should have a fair understanding of how COR•REC Module plug-ins are wired to the platform. Take a look at Help/Preferences you will see how we suggest allowing users to manage API access to your plug-in.
There is a free version of COR•REC Accounting you may acquire so that you may understand the depth of the platform.
Reference Links: